
Spreadsheet builder provides convenient way how to read and create MS Excel OfficeOpenXML Documents (XSLX) focus not only on content side but also on easy styling.
| Newer version including Java 8 support available under new coordinates: http://spreadsheet.dsl.builders |
Writing Spreadsheets
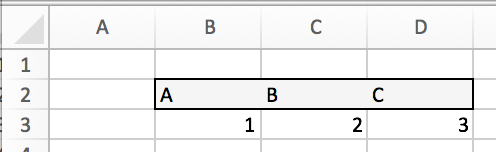
Following example creates the basic spreadsheet with two rows and three columns.
@Grab(group='org.modelcatalogue', module='spreadsheet-builder-poi', version='0.4.1')
// fixes bugs on Groovy 2.4.x
@Grab(group='commons-codec', module='commons-codec', version='1.10')
@GrabExclude('org.codehaus.groovy:groovy-all')

import org.modelcatalogue.spreadsheet.api.Cell
import org.modelcatalogue.spreadsheet.builder.poi.PoiSpreadsheetBuilder
import org.modelcatalogue.spreadsheet.query.api.SpreadsheetCriteria
import org.modelcatalogue.spreadsheet.query.poi.PoiSpreadsheetCriteria

File file = new File('spreadsheet.xlsx')

PoiSpreadsheetBuilder.INSTANCE.build {                                                  // <1>
    sheet('Sample') {                                                                   // <2>
        row {                                                                           // <3>
            cell 'A'                                                                    // <4>
            cell 'B'
            cell 'C'
        }
        row {
            cell 1
            cell 2
            cell 3
        }
    }
} writeTo file // <5>| 1 | Build new spreadsheet based on Apache POI |
| 2 | Create new sheet with the name Sample |
| 3 | Create new row |
| 4 | Create new cell |
| 5 | Write the spreadsheet to the file |
Result
|
You can pass an existing spreadsheet file as a template as the very first argument of the |
Sheets and Rows
Each sheet needs to have a name provided. Rows are defined inside the sheets.
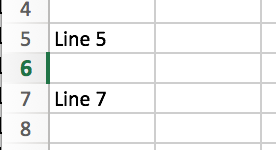
You can specify the row number when creating a row. Another rows created without the number specified will be placed
after this row. The row number is the same as in the spreadsheet e.g. the index of the rows is starting with number 1.
To skip a single row, just use row() without any parameters.
sheet('Sample') {
    row 5, { cell 'Line 5' }
    row()
    row { cell 'Line 7' }
}
Result
Outlines
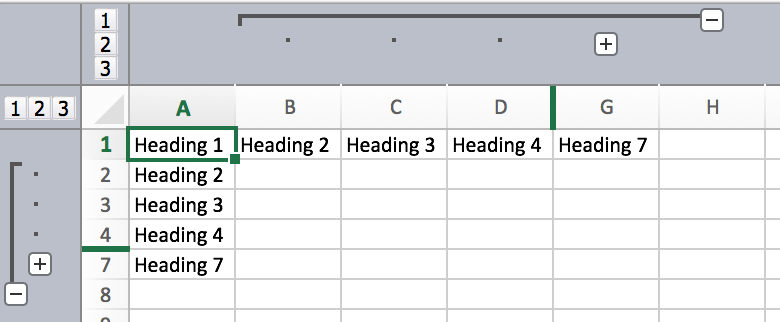
Rows and columns can be optionally grouped into expanded or collapsed groups for better readability.
sheet('Sample') {
    row {
        cell 'Heading 1'
        group {
            cell 'Heading 2'
            cell 'Heading 3'
            cell 'Heading 4'

            collapse {
                cell 'Heading 5'
                cell 'Heading 6'
            }
            cell 'Heading 7'
        }
    }

    // expanded group
    group {
        row { cell 'Heading 2' }
        row { cell 'Heading 3' }
        row { cell 'Heading 4' }

        // collapsed group
        collapse {
            row { cell 'Heading 5' }
            row { cell 'Heading 6' }
        }
        row { cell 'Heading 7' }
    }
}
Result
Freezing columns and rows
You can freeze some rows and or columns to prevent scrolling them.
sheet('Sample') {
    freeze 1, 1

    row {
        cell '-'
        cell 'A'
        cell 'B'
        cell 'C'
        cell 'D'
        cell 'E'
        cell 'F'
    }
    10.times { int i ->
        row {
            cell "Row ${i + 1}"
            6.times { int j ->
                cell (10 * i + j)
            }
        }
    }
}
Result
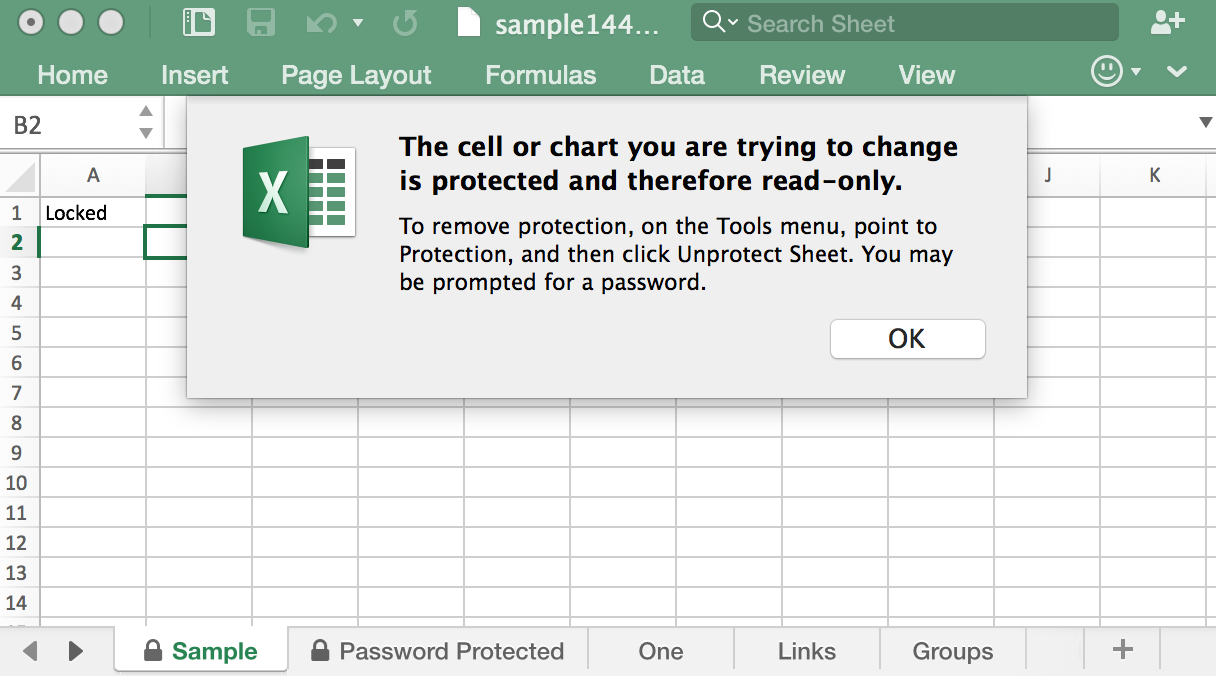
Protection
You can either lock the sheet or you can protect it with password. Then the users won’t be able to edit any cells or view any formulas. This can emphasize that user changes are not desired.
sheet('Sample') {
    lock it // 'it' represents the first argument of the closure
    row {
        cell {
            value 'Locked'
        }
    }

}
sheet('Password Protected') {
    password 'p4$$w0rd'
    row {
        cell 'Protected by Password'
    }
}
Result
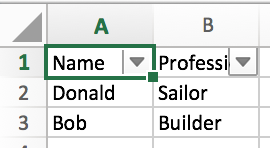
Automatic Filters
You can create an automatic filter for all data in given sheet.
sheet('Filtered') {
    filter auto
    row {
        cell 'Name'
        cell 'Profession'
    }
    row {
        cell 'Donald'
        cell 'Sailor'
    }
    row {
        cell 'Bob'
        cell 'Builder'
    }
}
Result
Page Settings
You can define the paper size, orientation and on how many pages should the sheet be printed within the page closure
of the sheet.
sheet('Custom Page') {
    page {
        paper a5
        fit width to 1
        orientation landscape
    }
    row {
        cell 'A5 Landcapse'
    }
}
Cells
Cells are defined within rows. The simples example to create a cell is providing its value as a method call argument.
Additionally you can customize more details when you pass a closure with the cell definition. Then you can either
set the value of the cell using the value method or the formula using the formula method.
|
You can substitute the |
You can either specify the column for the cell as number starting from 1 or alphabetically as it will appear
in the generated spreadsheet e.g. C. Otherwise the cells will be generated one after another. To create empty cell
call the cell method without any parameters.
sheet('Sample') {
    row {
        cell 'First'
        cell()
        cell 'Third'
        cell(5) {
            value 'Fifth'
        }
        cell('G') {
            formula 'YEAR(TODAY())'
        }
    }
}
Result

Type handling
Any cell values which are not instances of Number, Boolean, Date or Calendar are handled as String using a toString()
method. For any instance of Number, Date or Calendar the type of cell is set to NUMERIC.
For Boolean the type of the cell is set automatically to BOOLEAN.
|
|
Merging cells
You can set rowspan and/or colspan of any cell to merge multiple cells together.
sheet('Sample') {
    row {
        cell {
            value "Columns"
            colspan 2
        }
    }
    row {
        cell {
            value 'Rows'
            rowspan 3
        }
        cell 'Value 1'
    }
    row {
        cell ('B') { value 'Value 2' }
    }
    row {
        cell ('B') { value 'Value 3' }
    }
}
Result

Images
You can insert an image calling one of png, jpeg, emf, wmf, pict, dib method inside the cell definition.
cell ('C') {
    png image from 'https://goo.gl/UcL1wy'
}
Result
The source of the image can be String which either translates to URL if it starts with https:// or http:// or
a file path otherwise. For advanced usage it can be also byte array or any InputStream.
|
Resizing images with API is not reliable so you need to resize your image properly before inserting into the spreadsheet. |
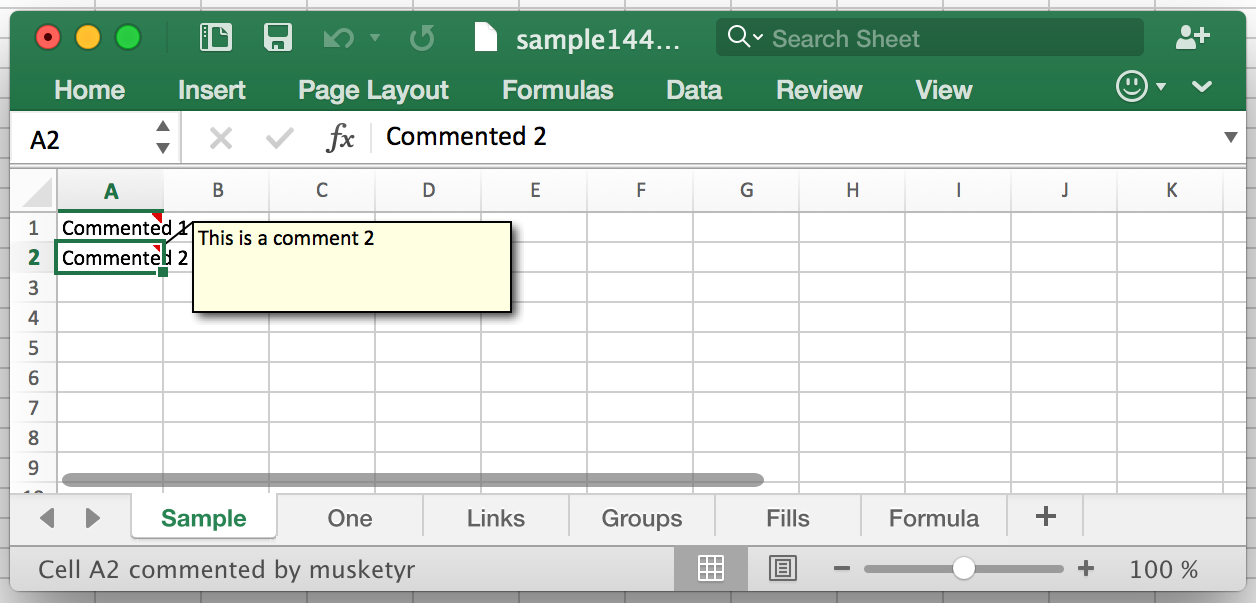
Comments
You can set comment of any cell using the comment method. Use the variant accepting closure If you want to specify
the author of the comment as well. The author only appears in the status bar of the application.
sheet('Sample') {
    row {
        cell {
            value "Commented 1"
            comment "This is a comment 1"
        }
    }
    row {
        cell {
            value "Commented 2"
            comment {
                author "musketyr"
                text "This is a comment 2"
            }
        }
    }
}
Result
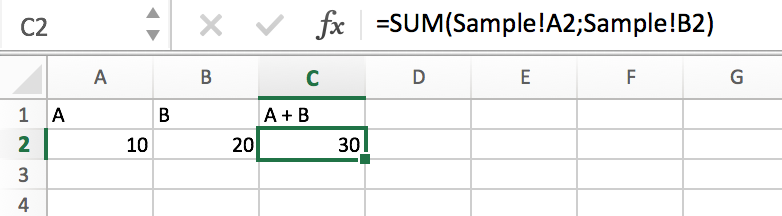
Names
Naming cells helps you to refer them with links or you can use them to expand the formula definitions. To declare name
of the cell simply call the name method inside the cell definition. See Links
use names to create link
to the particular cell.
sheet('Sample') {
    row {
        cell 'A'
        cell 'B'
        cell 'A + B'
    }
    row {
        cell {
            value 10
            name 'CellA'
        }
        cell {
            value 20
            name 'CellB'
        }
        cell {
            formula 'SUM(#{CellA},#{CellB})'
        }
    }
}
Result
Links
You can create for types of links
-
link to name 'A Name'will create link other parts of the document using cell nameA Name -
link to url 'http://www.example.com'will create link to open URLhttp://www.example.com -
link to email 'musketyr@example.com'will create link to send mail tomusketyr@example.com -
link to file 'README.txt'will create link to open fileREADME.txt
|
Links does not appear blue and underline by default You need to style them appropriately yourself. |
sheet('Sample') {
    row {
        cell {
            value 'Hello World'
            name 'Salutation'
        }
    }
}
sheet('Links') {
    row {
        cell {
            value 'Document'
            link to name 'Salutation'
            width auto
        }
        cell {
            value 'File'
            link to file 'text.txt'
        }
        cell {
            value 'URL'
            link to url 'https://www.example.com'
        }
        cell {
            value 'Mail (plain)'
            link to email 'musketyr@example.com'
        }
        cell {
            value 'Mail (with subject)'
            link to email 'musketyr@example.com',
                cc: 'tester@example.com'
                subject: 'Testing Excel Builder',
                body: 'It is really great tools'
        }
    }
}|
You can add arbitrary attributes to the email link such as |
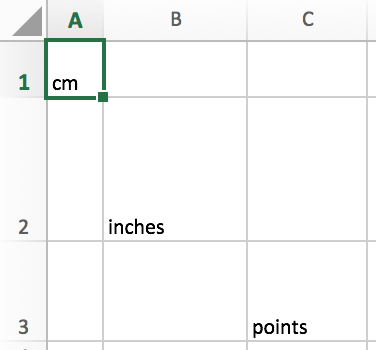
Dimensions
You can set the width of the cells as the multiple of standard character width, centimeters or inches.
You can also set the column to accommodate the width automatically using the auto keyword but it may slow down the generation. The width is defined inside cells
(usually header cells) but applies to the whole column.
You can set the height of the cell in points, centimeters or inches. The height applies to whole row.
sheet('Dimensions') {
    row {
        cell {
            value 'cm'
            height 1 cm
            width 1 cm
        }
    }

    row {
        cell('B') {
            value 'inches'
            width 1 inch
            height 1 inch
        }
    }
    row {
        cell('C') {
            value 'points'
            width 10
            height 50
        }
    }
}
Result
Styles
Cell styles are defined either for a whole row or a particular cell. You can define a named style on the top level along with sheets and than refer to it from cell or row.
style ('headers') {
    border(bottom) {
        style thick
        color black
    }
    font {
        bold
    }
    background whiteSmoke
}
sheet('Sample') {
    row {
        style 'headers'
        cell {
            value 'No.'
            width 5
        }
        cell {
            value 'Name'
            width 30
        }
        cell {
            value 'Description'
            width auto
        }
    }
    row {
        cell 1
        cell {
            value "Groovy Spreadsheet Builder"
            style {
                font {
                    bold
                }
            }
        }
        cell "Helps building nice spreadsheet reports"
    }
}
Result

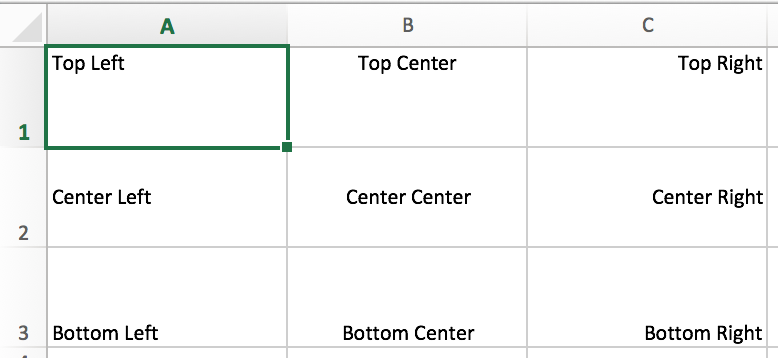
Alignments
Use align method to align the cells horizontally or vertically. You place the vertical alignment first and then
the horizontal. Use default value bottom if you dont want to change the vertical alignment but you want to change
the horizontal one.
Horizontal alignment options are: center, centerSelection, distributed, fill, justify, left and right.
See HorizontalAlignment for
full description of horizontal alignment options.
Vertical alignment options are: bottom, center, distributed, justified and top.
See VerticalAlignment for
full description of vertical alignment options.
sheet('Sample') {
    row {
        cell {
            value 'Top Left'
            style {
                align top left
            }
            width 20
            height 50
        }
        cell {
            value 'Top Center'
            style {
                align top center
            }
            width 20
        }
        cell {
            value 'Top Right'
            style {
                align top right
            }
            width 20
        }
    }
    // rest skipped
 }
Result
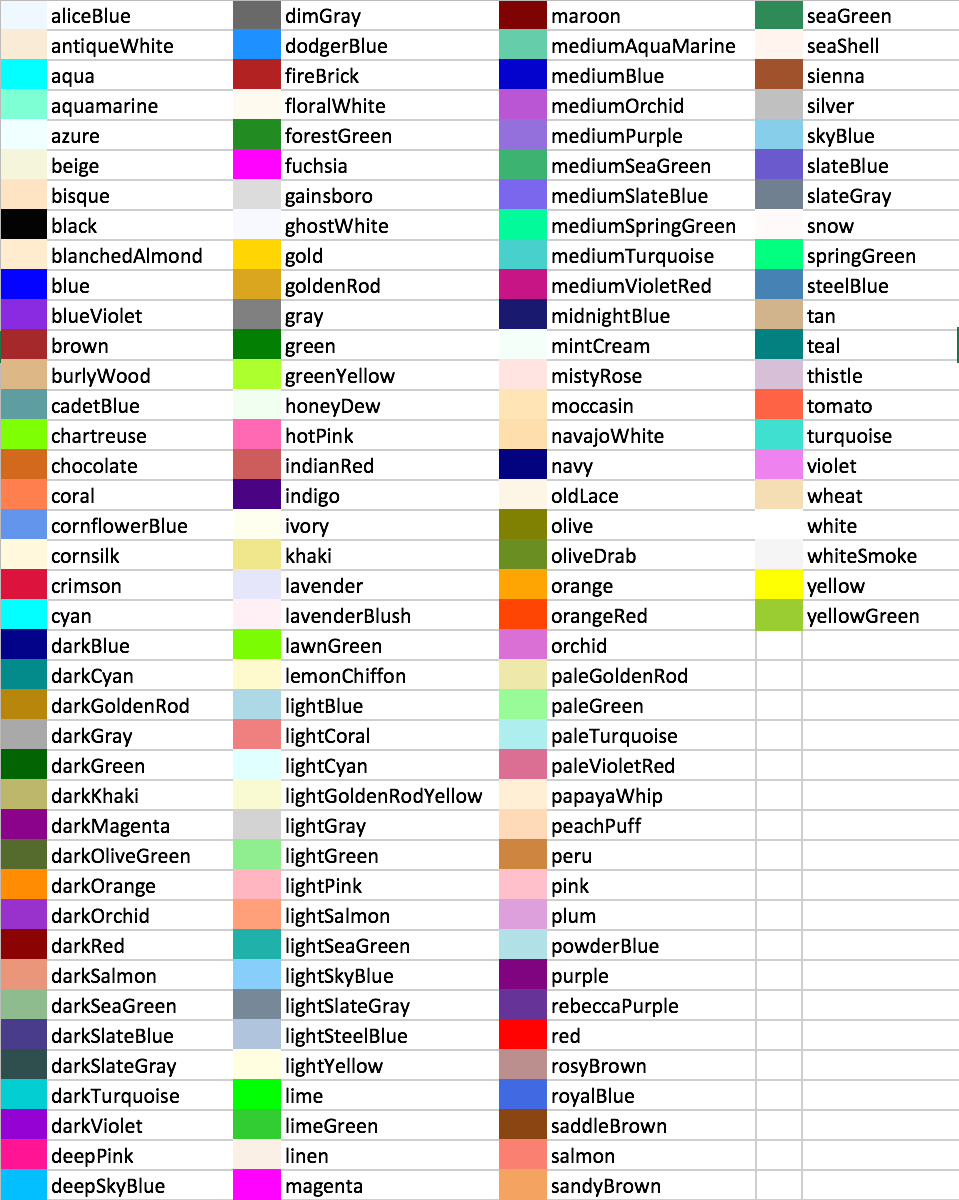
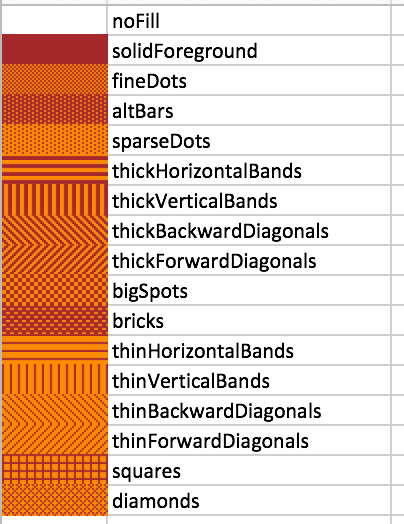
Fills
You can set the background color or combination of foreground color, background color and fill to customize cells'
appearance. Color can be set as hexadecimal string starting with # or you can use one of predefined colors
which are exactly the same as HTML predefined colors.
cell {
    style {
        background '#FF8C00' // darkOrange
        foreground brown
        fill square
    }
}
Available predefined colors
Available fill values
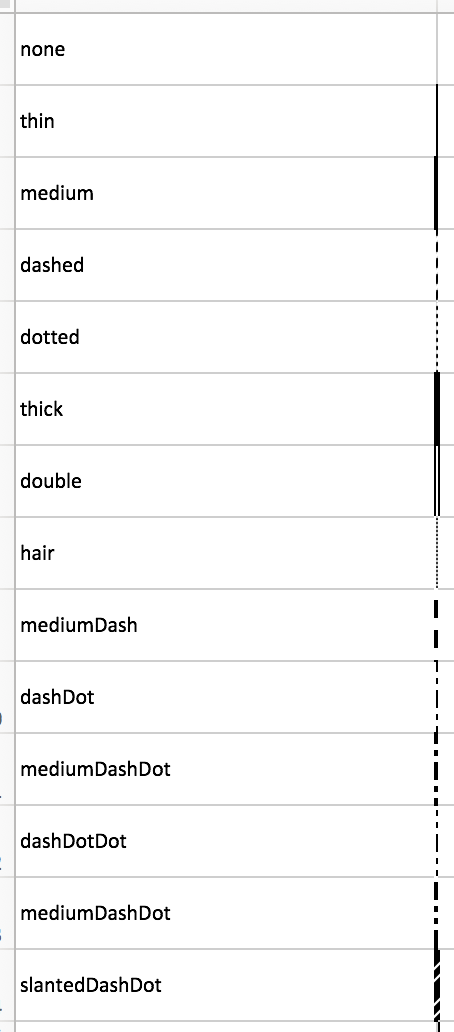
Borders
You can define a color and style of the cell border. To address which color to change, use top, bottom, left
and/or right keywords when calling the border method. See Available predefined colors.
Colors can be defined as hexadecimal string as well.
cell {
    style {
        border top, bottom, {
            style solid
            color gray
        }
    }
}
Available border styles
Fonts
You can customize the font size, name and color of the text in the cell. You also can make it bold, italic, underline or
strikeout. See Available predefined colors.
row {
    cell {
        width auto
        value 'Bold Red 22'
        style {
            font {
                make bold
                color red
                size 22
            }
        }
    }
    cell {
        width auto
        value 'Underline Courier New'
        style {
            font {
                make underline
                name 'Courier New'
            }
        }
    }
    cell {
        width auto
        value 'Italic'
        style {
            font {
                make italic
            }
        }
    }
    cell {
        width auto
        value 'Strikeout'
        style {
            font {
                make strikeout
            }
        }
    }
}
Result

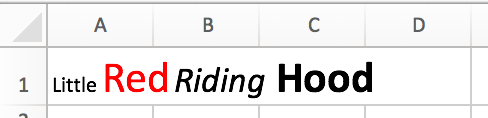
Rich Texts
Apart from setting the font for the whole cell you can create a rich text cell content as well. Instead of value
use multiple calls to text method which takes optional closure to define the font for the current text run. The font
definition is the same as above.
cell {
    text 'Little'
    text ' '
    text 'Red', {
        color red
        size 22
    }
    text ' '
    text 'Riding', {
        make italic
        size 18
    }
    text ' '
    text 'Hood', {
        make bold
        size 22
    }

}
Result
|
Some older versions that 3.13 of Apache POI does not handle rich texts well. Please, make sure you are using at least version 3.13. |
Data formats
You can assing a data format using the format method. Detailed guide how the format works can be found in
How to control and understand settings in the Excel for Format Cells
dialog box. Apache POI Builtin Formats
are great way how to find some of the most common formats.
Following example will print current date as e.g. 31.12.15.
cell {
    style {
        value new Date()
        format 'dd/mm/yy'
    }
}
Each of the formats can contain up to four parts separated by semicolon: <POSITIVE>;<NEGATIVE>;<ZERO>;<TEXT>.
The excerpt from the official documentation follows:
Format Symbol      Description/result
   ------------------------------------------------------------------------

   0                  Digit placeholder. For example, if you type 8.9 and
                      you want it to display as 8.90, then use the
                      format #.00

   #                  Digit placeholder. Follows the same rules as the 0
                      symbol except Excel does not display extra zeros
                      when the number you type has fewer digits on either
                      side of the decimal than there are # symbols in the
                      format. For example, if the custom format is #.## and
                      you type 8.9 in the cell, the number 8.9 is
                      displayed.

   ?                  Digit placeholder. Follows the same rules as the 0
                      symbol except Excel places a space for insignificant
                      zeros on either side of the decimal point so that
                      decimal points are aligned in the column. For
                      example, the custom format 0.0? aligns the decimal
                      points for the numbers 8.9 and 88.99 in a column.

   . (period)         Decimal point.

   %                  Percentage. If you enter a number between 0 and 1,
                      and you use the custom format 0%, Excel multiplies
                      the number by 100 and adds the % symbol in the cell.

   , (comma)          Thousands separator. Excel separates thousands by
                      commas if the format contains a comma surrounded by
                      '#'s or '0's. A comma following a placeholder
                      scales the number by a thousand. For example, if the
                      format is #.0,, and you type 12,200,000 in the cell,
                      the number 12.2 is displayed.

   E- E+ e- e+        Scientific format. Excel displays a number to the
                      right of the "E" symbol that corresponds to the
                      number of places the decimal point was moved. For
                      example, if the format is 0.00E+00 and you type
                      12,200,000 in the cell, the number 1.22E+07 is
                      displayed. If you change the number format to #0.0E+0
                      the number 12.2E+6 is displayed.

   $-+/():space       Displays the symbol. If you want to display a
                      character that is different than one of these
                      symbols, precede the character with a backslash (\)
                      or enclose the character in quotation marks (" ").
                      For example, if the number format is (000) and you
                      type 12 in the cell, the number (012) is displayed.

   \                  Display the next character in the format. Excel does
                      not display the backslash. For example, if the number
                      format is 0\! and you type 3 in the cell, the value
                      3! is displayed.

   *                  Repeat the next character in the format enough times
                      to fill the column to its current width. You cannot
                      have more than one asterisk in one section of the
                      format. For example, if the number format is 0*x and
                      you type 3 in the cell, the value 3xxxxxx is
                      displayed. Note, the number of "x" characters
                      displayed in the cell vary based on the width of the
                      column.

   _ (underline)      Skip the width of the next character. This is useful
                      for lining up negative and positive values in
                      different cells of the same column. For example, the
                      number format _(0.0_);(0.0) align the numbers
                      2.3 and -4.5 in the column even though the negative
                      number has parentheses around it.

   "text"             Display whatever text is inside the quotation marks.
                      For example, the format 0.00 "dollars" displays
                      "1.23 dollars" (without quotation marks) when you
                      type 1.23 into the cell.

   @                  Text placeholder. If there is text typed in the
                      cell, the text from the cell is placed in the format
                      where the @ symbol appears. For example, if the
                      number format is "Bob "@" Smith" (including
                      quotation marks) and you type "John" (without
                      quotation marks) in the cell, the value
                      "Bob John Smith" (without quotation marks) is
                      displayed.

   DATE FORMATS

   m                  Display the month as a number without a leading zero.

   mm                 Display the month as a number with a leading zero
                      when appropriate.

   mmm                Display the month as an abbreviation (Jan-Dec).

   mmmm               Display the month as a full name (January-December).

   d                  Display the day as a number without a leading zero.

   dd                 Display the day as a number with a leading zero
                      when appropriate.

   ddd                Display the day as an abbreviation (Sun-Sat).

   dddd               Display the day as a full name (Sunday-Saturday).

   yy                 Display the year as a two-digit number.

   yyyy               Display the year as a four-digit number.

   TIME FORMATS

   h                  Display the hour as a number without a leading zero.

   [h]                Elapsed time, in hours. If you are working with a
                      formula that returns a time where the number of hours
                      exceeds 24, use a number format similar to
                      [h]:mm:ss.

   hh                 Display the hour as a number with a leading zero when
                      appropriate. If the format contains AM or PM, then
                      the hour is based on the 12-hour clock. Otherwise,
                      the hour is based on the 24-hour clock.

   m                  Display the minute as a number without a leading
                      zero.

   [m]                Elapsed time, in minutes. If you are working with a
                      formula that returns a time where the number of
                      minutes exceeds 60, use a number format similar to
                      [mm]:ss.

   mm                 Display the minute as a number with a leading zero
                      when appropriate. The m or mm must appear immediately
                      after the h or hh symbol, or Excel displays the
                      month rather than the minute.

   s                  Display the second as a number without a leading
                      zero.

   [s]                Elapsed time, in seconds. If you are working with a
                      formula that returns a time where the number of
                      seconds exceeds 60, use a number format similar to
                      [ss].

   ss                 Display the second as a number with a leading zero
                      when appropriate.

                      NOTE: If you want to display fractions of a second,
                      use a number format similar to h:mm:ss.00.

   AM/PM              Display the hour using a 12-hour clock. Excel
   am/pm              displays AM, am, A, or a for times from midnight
   A/P                until noon, and PM, pm, P, or p for times from noon
   a/p                until midnight.
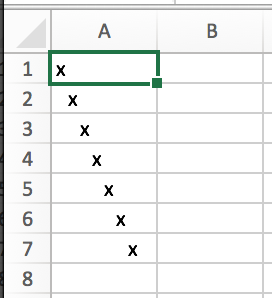
Indentations
You can set the indentation in number of characters from the beginning of the cell.
sheet('Sample') {
    7.times { int i ->
        row {
            cell {
                value 'x'
                style {
                    indent i
                }
            }
        }
    }
}
Result
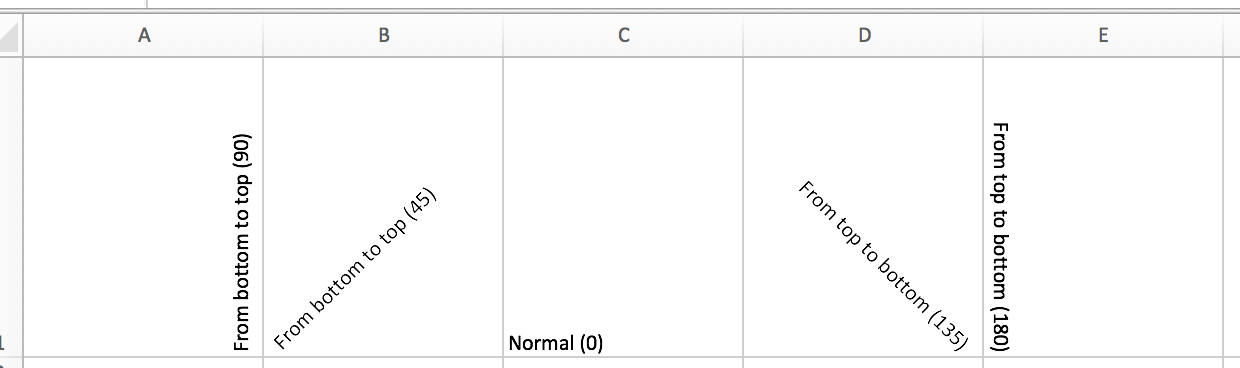
Rotation
You can rotate the text in the cell using the rotation method. It accepts number from 0 to 180.
Numbers lower from 1 to 90 will produces text going uphill and from 91 to 180 text going downhill
sheet('Sample') {
    row {
        cell {
            height 150
            width 20
            value 'From bottom to top (90)'
            style { rotation 90 }
        }

        cell {
            width 20
            value 'From bottom to top (45)'
            style { rotation 45 }
        }

        cell {
            width 20
            value 'Normal (0)'
        }

        cell {
            width 20
            value 'From top to bottom (135)'
            style { rotation 135 }
        }

        cell {
            width 20
            value 'From top to bottom (180)'
            style { rotation 180 }
        }
    }
}
Result
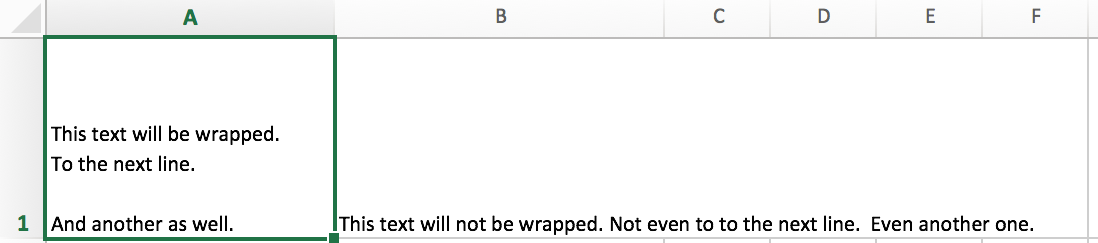
Text wrap
By default the text is not wrapped. This mean that the new lines characters present in the string are ignored.
You can update this by writing wrap text line in the style definition closure.
sheet('Sample') {
    row {
        cell {
            height 100
            width auto
            value '''
            This text will be wrapped.
            To the next line.

            And another as well.
            '''
            style {
                wrap text
            }
        }
        cell {
            width auto
            value '''
            This text will not be wrapped.
            Not even to to the next line.

            Even another one.
            '''
        }
    }
}
Result
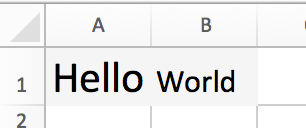
Reusing Styles
You can externalize your styles configuration into class implementing org.modelcatalogue.spreadsheet.builder.api.Stylesheet
interface to maximize code reuse or report customization.
class MyStyles implements Stylesheet {

    void declareStyles(CanDefineStyle stylable) {
        stylable.style('h1') {
            foreground whiteSmoke
            fill solidForeground
            font {
                size 22
            }
        }
        stylable.style('h2') {
            base 'h1'
            font {
                size 16
            }
        }
        stylable.style('red') {
            font {
                color red
            }
        }
    }
}
// usage
builder.build(out) {
    apply MyStyles // or apply(new MyStyles())
    sheet('Sample') {
        row {
            cell {
                value 'Hello'
                style 'h1'
            }
            cell {
                value 'World'
                style 'h2'
            }
            cell {
                value '!!!'
                styles 'h2', 'red'
            }
        }
    }
}
Result
Reading and Querying spreadsheets
You can query the spreadsheet with similar syntax as you build it.
@Grab(group='org.modelcatalogue', module='spreadsheet-builder-poi', version='0.4.1')
// fixes bugs on Groovy 2.4.x
@Grab(group='commons-codec', module='commons-codec', version='1.10')
@GrabExclude('org.codehaus.groovy:groovy-all')
import org.modelcatalogue.spreadsheet.api.Cell
import org.modelcatalogue.spreadsheet.query.api.SpreadsheetCriteria
import org.modelcatalogue.spreadsheet.query.poi.PoiSpreadsheetCriteria
File file = new File('spreadsheet.xlsx')
SpreadsheetQuery query = PoiSpreadsheetCriteria.FACTORY.forFile(file) // <1>
Collection| cells = query.query { // <2>
sheet { // <3>
row { // <4>
cell {
value 'B' // <5>
}
}
}
}
assert cells.size() == 1
assert cells.first().value == 'B' | | 1 | Create new spreadsheet query for given file |
| 2 | Start a query |
| 3 | Query any sheet |
| 4 | Query any row |
| 5 | Query every cell containing value 'B' |
The query method returns collections of every cell found matching given criteria. There is also shortcut methods
all(), find() and exists() to return every cell, find single cell or just test for cell presence.
Data Model
The Cell objects provides getters counterparts to methods supported by query such as getName(). You can also
easily navigate into all eight directions with methods like getLeft(), getAboveLeft() etc. or access the whole
row with getRow(). Rows can be also easily navigated with getAbove() and getbellow methods.
Cell a = query.find {
    sheet {
        row {
            cell {
                value 'A'
            }
        }
    }
}

assert a.right.value == 'B'
assert a.row.bellow.cells.first().value == a.bellow.value
Sheets and Rows
You can query only specific sheet or row
Sheet content = query.query {
    sheet('Content')
}.sheet
Result: Sheet Content if present.
You can query sheet by its page setting
Collection a5s = query.query {
    sheet {
        page {
            paper a5
            orientation landscape
        }
    }
}.sheets
Result: Every sheet having the page settings set to A5 paper and with landscape orientation.
You can use predicates in many places in the Query API if the simple condition does not met your needs. You can address rows by it number. The number starts with one so it corresponds the one displayed in Excel.
Collection rows = query.query {
    sheet(name({ name.startsWith('Con') })) {
        row(1)
    }
}.rows
Result: Every first row of every sheet which name starts with Con.
If you repeat the call to either sheet or row query method you it’s understood as and condition but
you can also create or condition by wrapping the calls with or method.
 query.query {
    or {
       sheet(name({ name.startsWith('Con') })) {
         row(1)
       }
       sheet(name({ name.endsWith('Air') })) {
         row(2)
       }
    }
 }
Result: Every cell from every first row of every sheet which name starts with Con and every cell
from every second row of sheet which name ends with Air. If the one sheet fits both criteria the cells are not returned
twice.
Also row method accepts predicate with two predefined number and range.
query.query {
    sheet {
        row (range(1,10)) { // body required when the predicate is used }
    }
}
Result: Every cell from first ten rows of every sheet in the spreadsheet.
If you have a row containing headers to the following rows you can convert any of following rows to data row which provide convenient way how to retrieve cells using the label specified in the header
Row manyRowsHeader = matcher.query {
    sheet('many rows') {
        row(1)
}   }.row

Row manyRowsDataRow= matcher.query {
    sheet('many rows') {
        row(2)
}   }.row

DataRow dataRow = DataRow.create(manyRowsDataRow, manyRowsHeader)
assert dataRow['One']
assert dataRow['One'].value == 1
Cells
You can easily specify which cells you want to return from the query. For example by specifying desired value.
You can also query for more specific type with date, number, string, bool methods.
query.query {
    sheet {
        row {
            cell {
                value 'B'
            }
        }
    }
}
Result: Every cell from any sheet and row with value 'B'
You can only return cells from specific column or column range specified by both number or string.
query.query {
    sheet {
        row {
            cell('B')
        }
    }
}
Result: Every cell from column 'B' of any sheet and row
Merged Cells
You can query for merged cells only.
query.query {
    sheet {
        row {
            cell {
                colspan 5
                rowspan 2
            }
        }
    }
}
Result: Every cell in the spreadsheet which are merged over five cells horizontally and two cells vertically.
Comments
You can query for cells with given comment.
query.query {
    sheet {
        row {
            cell {
                comment "This is interesting"
            }
        }
    }
}
Result: Every cell in the spreadsheet which has a comment "This is interesting".
Again you can use predicate closure to be more specific.
query.query {
    sheet {
        row {
            cell {
                comment { it.author == 'Steve' }
            }
        }
    }
}
Names
You can query for specific named cell.
query.find {
    sheet {
        row {
            cell {
                name "THE_CELL"
            }
        }
    }
}
Result: The cell with the named reference 'THE_CELL'.
|
Be careful as the names can be different than the one you’ve used in the builder as some implementation has certain naming limitations. |
Styles and Fonts
You can query cells by style parameters such as foreground color or font height. All the options from the style builder is currently supported except text wrapping, rich texts and alignment options. All font options are supported. See the guide above for reference.
query.find {
    sheet {
        row {
            cell {
                style {
                    foreground red
                    font {
                        make bold
                        color white
                    }
                }
            }
        }
    }
}
Result: Every cell from the spreadsheet which has red foreground and white font color with bold style.
|
The color you usually see in the cell is |
Changelog
0.4.1
Added DataRow for easier retrieval of row data.
0.4.0
Ability to also retrieve sheet or rows from the criteria query.
Breaking Changes
Criteria methods query and all no longer returns collections of cells but object of type SpreadsheetCriteriaResult.
This object itself implements at least Iterable<Cell> interface allowing to use the results directly in the for loops
and call most of the default groovy method available on collections. Collection<Cell> as well as Collection<Row>
and Collection<Sheet> can be accessed using the result object properties cells, rows and sheets.
0.3.7
Simple page settings, ability to set cells' width and height in centimeters or inches and fixed merging row and cell styles.
0.3.6
Minor improvement in combination of the styles.
0.3.5
Added ability to defined named styles for whole row and particular cell as well and fixed problem with merged cells formatting.
0.3.4
Added automatic filtering and allowed casting the api objects to their POI equivalents.
0.3.3
Fixed cells with value 0 rendered as empty cell.
0.3.2
Ability to use existing spreadsheet as a template in builder’s build method.
0.3.0
Breaking Changes
No more single word mutating DSL statements such as locked or bold as they conflicts with newly introduced getters.
Keywords which are already getters such as black for color of same name remain unaffected.
sheet {
    lock it // instead of "locked"
}

font {
    make italic          // instead of "italic"
    make bold, underline // you can supply more than one style
}
The package and names for interfaces has been changed. Most of the previous
API now resides in org.modelcatalogue.spreadsheet.builder.api package. The
name of the interfaces used by builder closures got *Definition suffix (e.g. SheetDefinition)
to distinguish them from the ones returned from queries.
The way how the builder is initialized has shifted to Factory patten to distinguish between writing and building
0.2.0
Introduced getters for parent such as workbook for sheet etc.